Aquasure Harmony Series Installation Tips: Avoid Common Mistakes
Installing the Aquasure Harmony Series water conditioner correctly is critical to ensuring long-term performance and avoiding costly callbacks. Many owners of this salt-free system overlook key steps during installation, such as proper bypass placement, drain line routing, and digital display calibration. This article provides specific, practical advice to help you avoid the most frequent installation errors.
Why Is the Bypass Valve Position Often Misunderstood During Aquasure Harmony Series Setup?
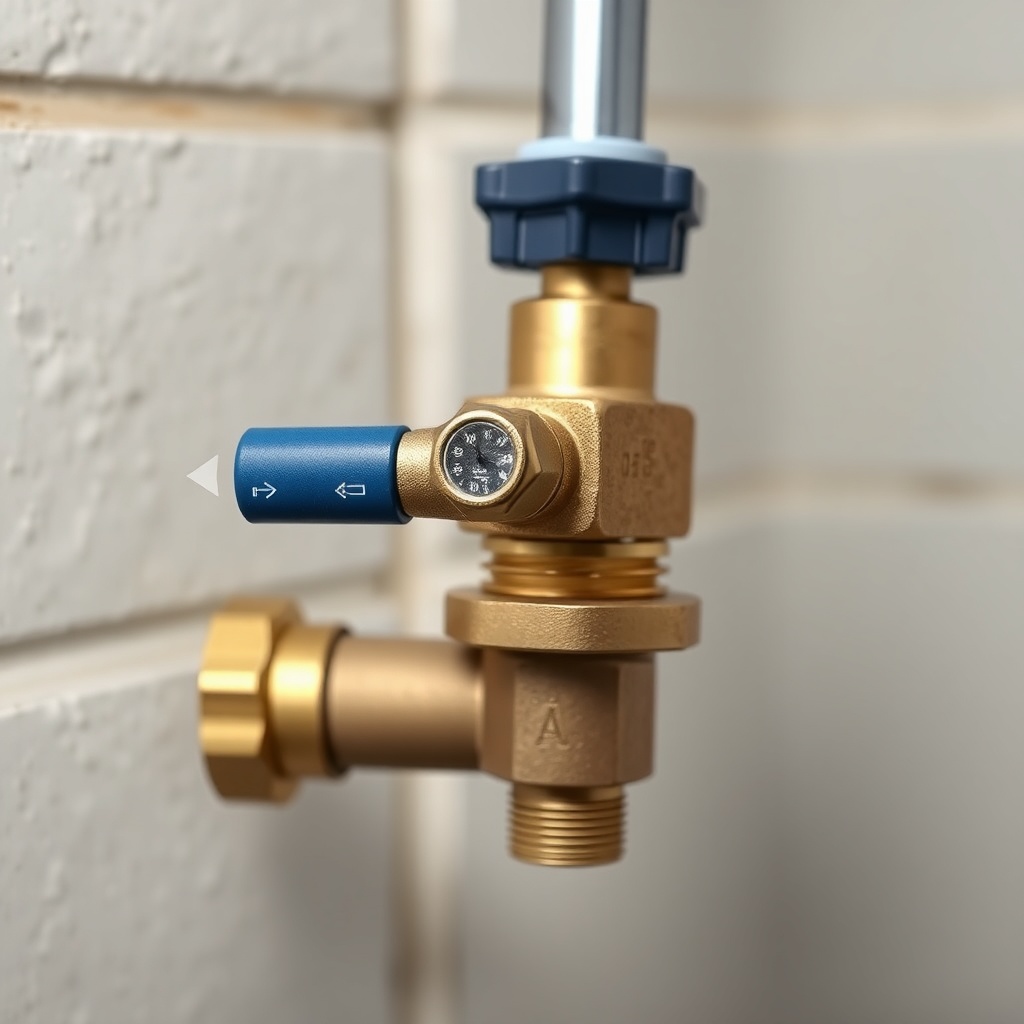
The Aquasure Harmony Series includes a built-in bypass valve that allows you to isolate the conditioner for maintenance without shutting off water to the house. A common mistake is leaving the bypass handle in the “service” position during initial pressure testing, which can flood the media tank with debris from new plumbing. Always start with the valve in “bypass” mode, flush the supply line for 60 seconds, then slowly turn to “service” while monitoring for leaks at the inlet and outlet connections. Another error is confusing the “bypass” and “normal operation” positions: check the arrow indicator on the valve body aligned with the flow direction marked on the system label. If you need to understand how the bypass interacts with the digital controller, see Aquasure Harmony Series Smart Features: Understanding the Digital Display for details on the display’s bypass alert feature.
How Should Drain Line and Overflow Connections Be Routed for the Aquasure Harmony Series?
Proper drain line routing is critical for the Harmony Series, particularly for the backwash cycle used during regeneration in the salt-free conditioner models that require periodic flushing. The drain line must be secured to a floor drain or standpipe with an air gap—at least two pipe diameters above the flood rim—to prevent siphoning and backflow contamination. A frequent mistake is using a hose diameter smaller than 3/4 inch or routing the line more than 30 feet horizontally, which reduces flow and causes the control valve to stall mid-cycle. Also, never insert the drain line directly into a drain pipe without a p-trap; instead, use a dedicated drain connection with a check valve if local code requires it. For detailed steps on cleaning the drain line and media tank, refer to How to Clean and Maintain Your Aquasure Harmony Series Conditioner.
What Are Common Power Supply and Wiring Errors with the Aquasure Harmony Series Smart Display?
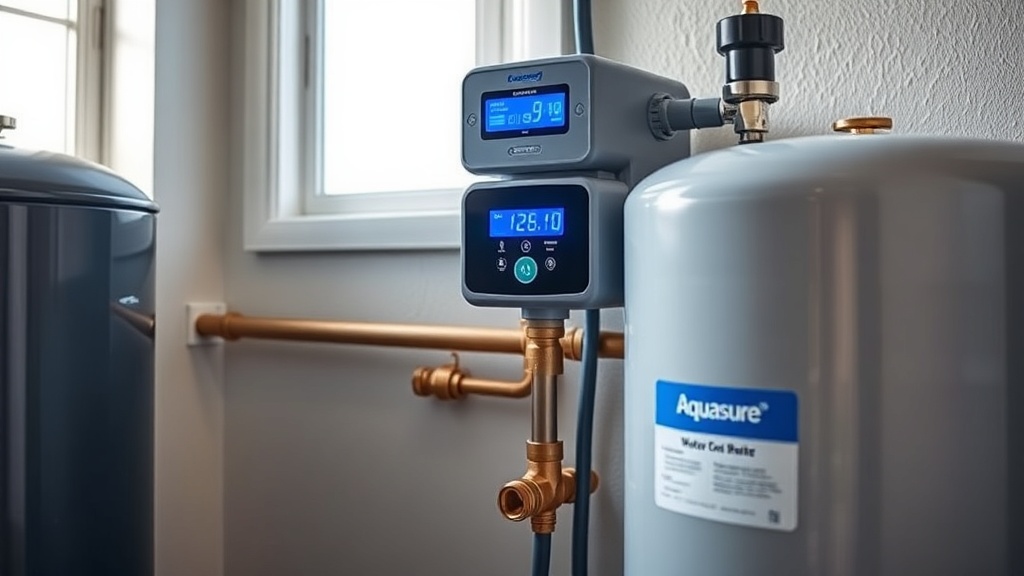
The digital display on the Aquasure Harmony Series requires a dedicated 24V DC power supply, typically plugged into a GFCI-protected outlet. One recurring issue is wiring the transformer directly into a switched receptacle—if someone switches off the outlet, the system loses its programming, which can cause the media tank to go into an uncontrolled backwash cycle when power returns. Always plug the transformer into an unswitched outlet that is clearly labeled. Another mistake is using an extension cord longer than 6 feet, which can cause voltage drop and erratic display behavior. If the display shows “Err” or flickers, check the transformer connection first. For more on interpreting display codes, cross-reference with Aquasure Harmony Series Smart Features.
How Do You Avoid Incorrect Pipe Sizing and Connection Materials for the Aquasure Harmony Series?
The Harmony Series inlet/outlet ports are 1-inch NPT female threads, but many installers mistakenly use 3/4-inch pipe or flexible braided hoses, which restrict flow and void the warranty. Always use full 1-inch copper, PEX, or CPVC piping for the main supply line, with brass or stainless steel fittings. A common error is over-tightening the plastic union connections on the control valve head, which can crack the housing. Hand-tighten plus a half-turn with a strap wrench is sufficient. Additionally, never use pipe dope or tape on the O-ring seals—only use silicone grease on the rubber gaskets. If you are transitioning from a traditional salt-based system, see Aquasure Harmony Series Salt-Free Benefits: Why Choose a Conditioner to understand why pipe sizing matters more with salt-free conditioners.
Why Is the Installation Location and Leveling Often Overlooked for the Aquasure Harmony Series?
The unit must be installed on a level, solid surface capable of supporting over 100 pounds when filled with water. A frequently missed step is failing to level the base, which causes uneven media distribution inside the tank and reduced conditioning effectiveness. Use a 4-foot level across the tank diameter and adjust the feet (if provided) or use shims under the base plate. Also, leave at least 18 inches of clearance above the control head for access to the display and valve service. Avoid placing the system near a water heater or furnace exhaust, as ambient heat above 110°F can damage the electronics. For a complete setup checklist, including location requirements, review the maintenance guide for pre-installation checks.
How Do Beginners Misinterpret the Meter Settings and Calibration for the Aquasure Harmony Series?
The Harmony Series digital controller requires setting the water hardness (in grains per gallon) and system capacity (in gallons). A typical mistake is entering the hardness as ppm instead of grains—divide ppm by 17.1 to convert. For a household with moderately hard water (10 gpg), the meter should be set to 10, not 171. Another error is forgetting to program the “day override” for backup: set it to 7 days so the system regenerates even if low usage hasn’t triggered a meter cycle. If the display shows “Clean” and the water quality declines, recalibrate using the test kit included with the system. The display menu navigation is similar to the model discussed in Smart Features: Understanding the Digital Display, which includes step-by-step programming for meter settings.
| Common Installation Mistake | Severity Level |
|---|---|
| Bypass valve left in service position during line flush | Usually not urgent (can be corrected with a short flush cycle) |
| Drain line undersized or too long | Needs attention soon (causes backwash failure and media fouling) |
| Power supply plugged into switched outlet | Needs attention soon (loses programming on power loss) |
| Over-tightening plastic union fittings | Usually not urgent (can be replaced if cracked, but costly) |
| Incorrect hardness setting (ppm vs. gpg) | Needs attention soon (leads to poor water conditioning or wasted cycles) |
| Unit installed on an uneven floor | Usually not urgent (can be shimmed later, but affects media performance) |
What Owners Say
Owners who successfully installed their Aquasure Harmony Series consistently highlight two observations. First, those who use Teflon tape on the inlet/outlet threads often struggle with slow leaks at the connections—experienced owners recommend using only silicone grease on the O-rings and finger-tightening the nuts. Second, many owners report that the digital display’s “Bypass” warning light saved them from leaving the system in service mode during a plumbing repair, which would have introduced sediment into the media. As one owner on a forum put it: “The manual skips the detail about the bypass handle needing to point exactly at the arrow. Once I figured that out, installation took 30 minutes.”
Frequently Asked Questions
How long does the Aquasure Harmony Series installation take?
For a DIY installer with basic plumbing skills, typical installation takes 2 to 4 hours, including mounting the tank, connecting piping, programming the controller, and performing a leak test. A professional plumber can complete it in under 1.5 hours.
Can I install the Aquasure Harmony Series on a well water system without pre-filtration?
Yes, but the system requires a separate sediment pre-filter if your well water contains visible particles or iron levels above 0.3 mg/L. The Harmony Series is designed for treated municipal or clarified well water; refer to the manual for specific water quality limits.
What tools are essential for installing the Aquasure Harmony Series?
You will need a pipe cutter, Teflon tape (only for threaded adapters), a strap wrench for the plastic unions, a 4-foot level, a drill with a 1/4-inch bit for mounting screws, and a silicone grease tube for O-rings. A voltage tester is recommended for the outlet.
How often does the media tank need to be replaced in the Aquasure Harmony Series?
The media in the Harmony Series typically lasts 5 to 7 years, depending on water hardness and chlorine levels. The control valve should be inspected every 6 months for O-ring wear. For replacement steps, see the maintenance guide linked above.
What does the “Clean” message on the Aquasure Harmony Series digital display mean?
The “Clean” indicator activates when the system has processed a preset volume of water (usually 1,500 to 3,000 gallons) and signals that a backwash cycle is needed. It does not indicate a fault; press the “Regen” button to initiate a manual cycle if auto regeneration is disabled.
Can I install the Aquasure Harmony Series outdoors in a warm climate?
No, the system is not rated for outdoor installation. Exposure to direct sunlight, rain, or ambient temperatures below 40°F or above 110°F can damage the electronics and media. Install it in a conditioned basement, utility room, or garage.